This post will walk through the process of setting up an Odroid M1 with the software required to run an Ethereum node.
This is more of an experiment rather than a suggested way to run an ethereum node. While there is guidance out there on running a node on a machine of this size, it may well be outdated at this point. Well see how this goes…
So you want to build an Ethereum node on budget? Don’t forget you get what you pay for…
It has been on my to do list for a while to set up an Ethereum node. I think it will be exciting to contribute to the network. I’m not necessarily looking to stake, With the 32 ETH required at current price price of $,1641 that’s an investment of $52,518.4 with no clear path to withdrawals until the Shanghai Fork is completed. Not to mention, if I’m laying out that kind of money, it really isn’t congruent with the “on-a-budget” part of this project.
I wanted to build this myself, for the learnings. You can actually get pretty solid pre-built solutions nowadays to run nodes, if you do want to stake and want something really well built there’s a ton of (more expensive options). Here’s two examples:
- https://ava.do/ ~ That’ll set you back a minimum of $1,600
- https://dappnode.com/en-us ~ 1,616.00€ ($1696.8)
Not super cheap. Sure nothing compared to the 4 grand plus Bitcoin Nonce finding GPU monsters, but that’s not really a fair comparison. Hopefully POS is the environmentally friendly choice of the future. Incidentally, you can’t really make money mining bitcoin at this point unless you join some kind of syndicate since the probability of you finding that Golden Snitch (nonse) is not good, probably better odds than the NY lotto tho. Anyway, we’re not here for the money, we’re here for the community. That’s the main driver of interest in Crypto… right?… right?……..

I’m using this tutorial as an initial reference:
- HOW TO TURN YOUR RASPBERRY PI 4 INTO A NODE JUST BY FLASHING THE MICROSD CARD (tho this is really for a Raspberry Pi)
- and : Ethereum On Arm Documentation too (note, these instructions are for Linux and not Mac, also these instructions are to use the pre-built on ARM software but I am building from scratch on Ubuntu Server)
Also these hardware specs from the community
Community on Discord:
I highly recommend joining the following discord channels before you get started. People are very friendly and helpful, it’s an excellent resource if you get stuck:
Lets get into it…
Section 1. Buying Hardware
Hardware Specs:
Hardware Specs:
I was originally matching the required hardware specs from here (the eth on arm docs) but this is definitely a moving target…A bought the Samsung T7 2TB and attached via USB, but when trying to sync to the node it looks to be too slow. So now I have a third source for hardware: from here. I found this by joining a couple discord channels to connect to the community which I recommend everyone does too. Some specific. advice I got about the P31 NVMe was
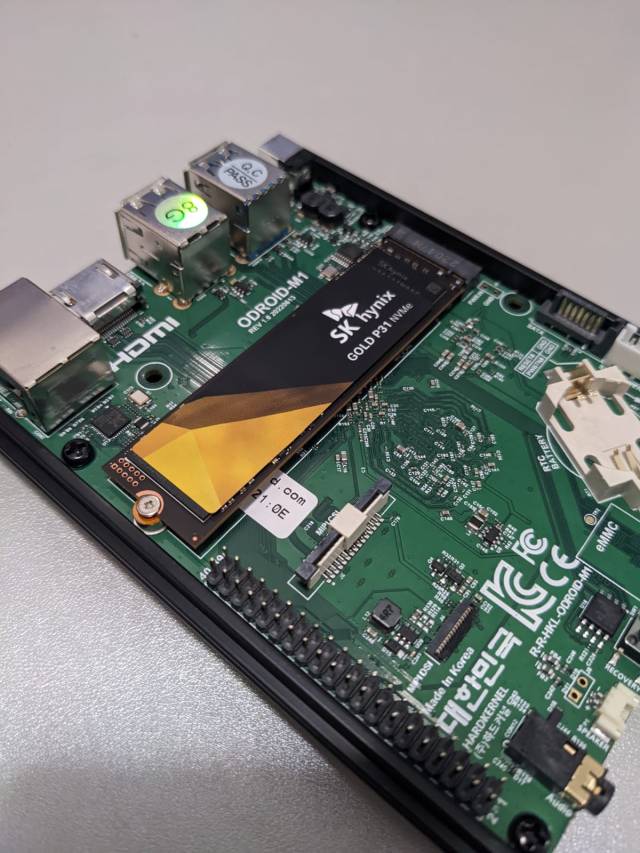
…the T7 is known to not be fast enough to sync mainnet…since the M1 can do NVMe with 2 lanes, do that instead…USB is always difficult, add to that the T7 being slower than the T5 and it’s a bit iffy. But even T5 isn’t fast. Do NVMe, since you can…. The P31 btw is by far the lowest-wattage drive you can find. If you can find that on sale, it’s a good choice for these SBC devicesSee below in my specs a link to the P31.
You can’t get an 8GB Raspberry Pi for love no money at the moment. So I am using the Korean made Odroid M1. Here is my set up, along with what I’ve paid for everything so far:
- ODROID-M1 with 8GByte RAM ~ $90 (The unit comes with a heatsink but not a fan)
- ODROID-M1 power supply ~ $5.50
- ODROID-M1 case ~ $9.00
- P&P from Korea ~ $34.74
- SK hynix Gold P31 2TB PCIe NVMe ~ $119 (42% off right now) ~ You will also need a Phillips Precision Screwdriver size #1 to fit it to the droid
- SanDisk 128GB Ultra microSD ~ $15.75
- USB C SD Let Apple rob you blind adapter ~ $13.99 (just about cheaper than the SD card)
- Ethernet cable. I have this laying around.
- so the Grand Total is….. (does not do math(s) in head, Mathematicians can’t add, didn’t you know? ** don’t ask me to calculate the tip **)…

- Total: $287.98 (so about 5 times cheaper than the pre builds. (Remember, you get what you pay for…)
Section 2. Hardware installation and booting Ubuntu Server
Flashing the SD Card
Flashing the SD Card
Originally I was planning to use the Pre-Built Odroid on Arm software that automatically installs everything you need to run the node as per: https://ethereum-on-arm-documentation.readthedocs.io/en/latest/quick-guide/download-and-install.html
but when I tried to follow their installation instructions the given username and password just did not work to log in. Really bizarre and infuriating. I have raised an issue here on the Github page for the project. So instead I opted to install Ubuntu Server and install everything myself manually.
Flashing the SD Card with Ubuntu Server (on macOS Ventura)
- Download the Ubuntu Server OS from this page. or go directly to the download link.
- Insert SD card into computer or adaptor
- Open a terminal window and check your MicroSD device name by running:
I can see my external disk with 128GB:$ diskutil list We just need the path : “/dev/disk2”
 cdinto the directory of the downloaded file.- Unzip the file you downloaded
ubuntu-20.04-server-odroidm1-20220318.img.xz - Unmount the disk:
$ diskutil unmountDisk /dev/disk2 To write the image to the SD card, the command syntax is:
$ sudo dd bs=1m if=ubuntu-20.04-server-odroidm1-20220318.img of=/dev/disk2/ conv=sync status=progress
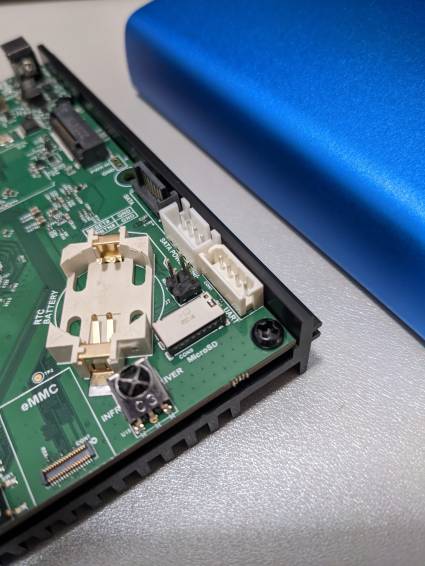
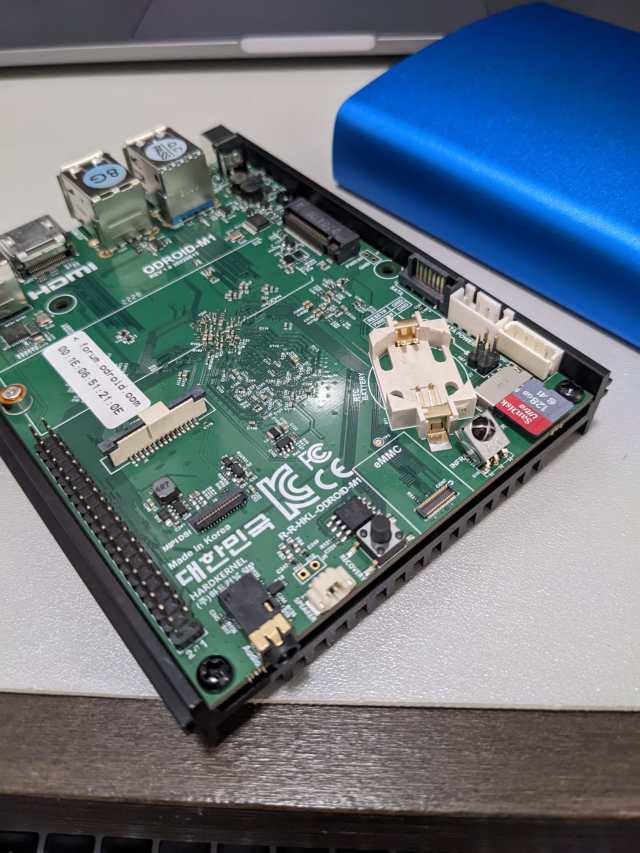
Unpack your Droid M1 and install Ubuntu
There is very little hardware setup required with the Droid or any of its siblings.
- Insert the Micro SD card into the Droid before you put the case on. You can see the slot here:

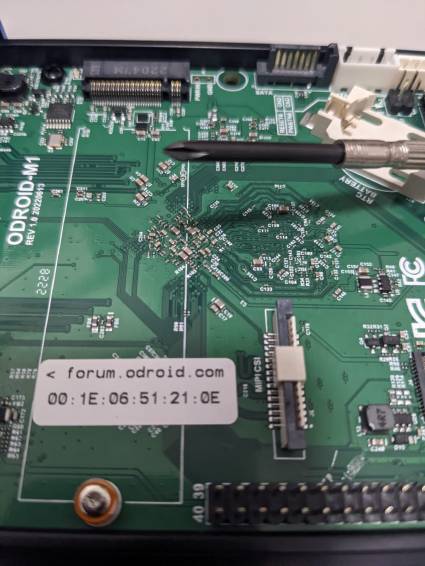
- Connect the NVMe drive (you will need the phillips #1 screwdriver):
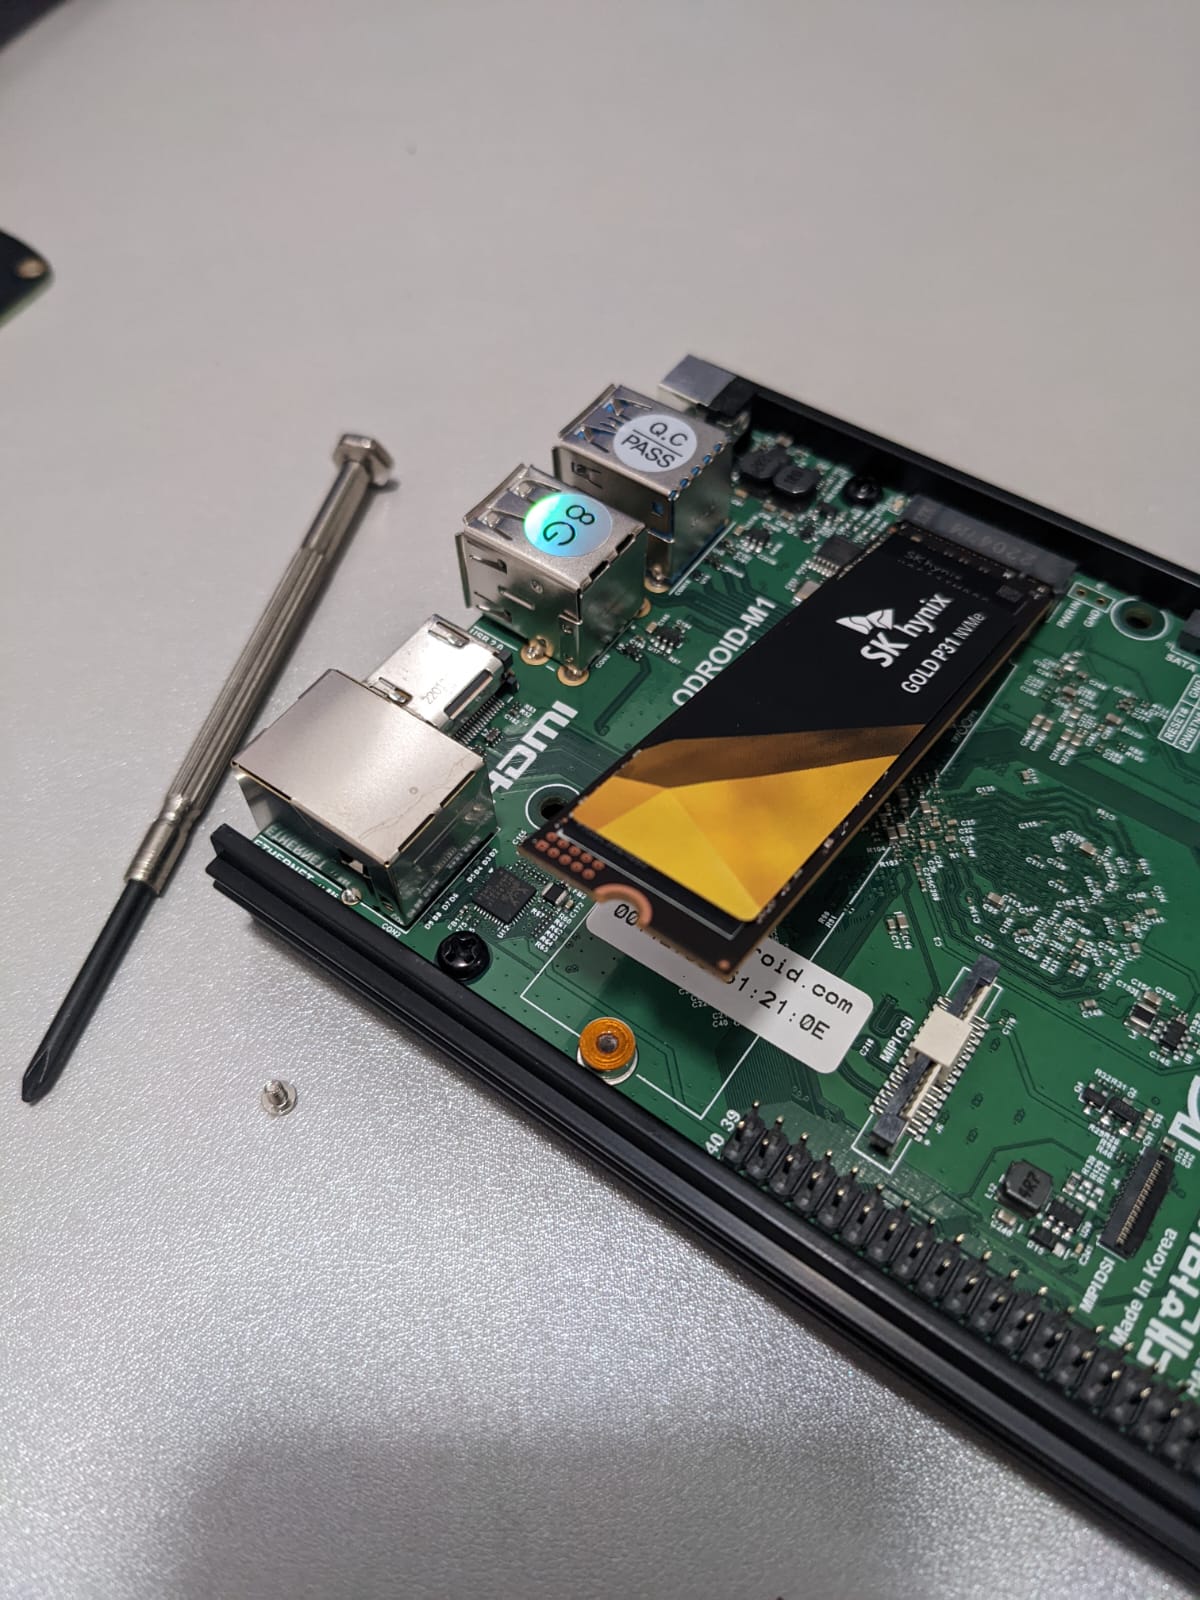
- Slide the case along the rails with the heatsink (the big black thing) along the bottom (and then screw the sides on):
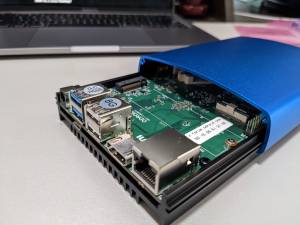
- Next, connect the ethernet cable and attach the other end to your router
- Connect the power supply and the device will power on.

Connect to the Droid with SSH
- Run the command
$ brew install nmap - Open system preferences, click “details” next to your active internet connection. From here you should see the local IP address of your router. It’s probably something like
192.168.1.0 - Then run
$ nmap -sP 192.168.1.0/24(or whatever the Router IP is) to find the local IP of the droid on your network. This was a little unintuitive to find since mine was not labelled. I just looked for the one I didn’t recognize. You can always try to ssh connect to any of them, it wont do any harm. - Login to the droid by running:
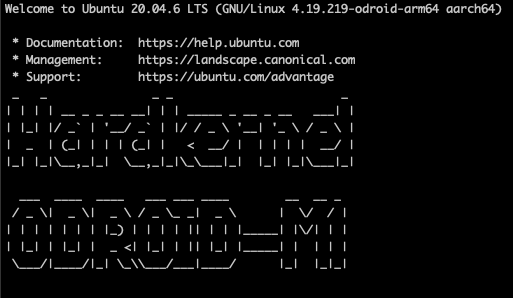
$ ssh odroid@[local-ip-address-of-droid]Access credentials
If you are successful you should see something like:Username Password odroid odroid 
- I recommend adding the connection to the ssh config since its hard to remember. Open (or create) the file
~/.ssh/configand insert:Host odroid HostName [local-ip-address-of-droid] User odroid - Now you can connect just by typing:
$ ssh odroid
Section 3. Software Installation
All subsequent commands are being run on the Odroid via ssh connection.
Mount the SSD Drive to the System
-
Run the command
$ lsblkto find the name of the drive
I can see the nameodroid@server:~$ lsblk NAME MAJ:MIN RM SIZE RO TYPE MOUNTPOINT mtdblock0 31:0 0 128K 0 disk mtdblock1 31:1 0 2M 0 disk mtdblock2 31:2 0 1M 0 disk mtdblock3 31:3 0 12M 0 disk mmcblk1 179:0 0 119.1G 0 disk ├─mmcblk1p1 179:1 0 256M 0 part /boot └─mmcblk1p2 179:2 0 118.9G 0 part / nvme0n1 259:0 0 1.8T 0 disknvme0n1next to the 1.8TB size - Partition the drive. Start the application
fdiskwith$ sudo fdisk /dev/nvme0n1(source) - Choose “n” to create a new partition, then “p” then “1” to create a new primary partition.
- Just use defaults, or just press enter when you asked about sector numbers.
- Then “w” to write the data to the disk. (the application should then close)
Command (m for help): w The partition table has been altered. Calling ioctl() to re-read partition table. Syncing disks. - Locate the name of the created partition on the disk by running
lsblkagain (for me it isnvme0n1p1 - Make the filesystem on the disk by running:
sudo mkfs -t ext4 /dev/nvme0n1p1 Create a directory to mount the drive onto (it can have any name):
$ sudo mkdir /mnt/ethdisk/- Mount the disk:
$ sudo mount /dev/nvme0n1p1 /mnt/ethdisk/ - Change owner and permissions
$ sudo chown -R odroid:odroid /mnt/ethdisk $ sudo chmod 764 /mnt/ethdisk - The disk is now mounted but if your system is rebooted the mount will no longer be up. We persist the mount by adding instructions to the file
/etc/fstab. Open$ sudo vim /etc/fstaband add the line:/dev/nvme0n1p1 /mnt/ethdisk ext4 defaults 0 0 - Test the mount persistence by rebooting and logging back in
$ sudo reboot, wait a few mins then log back in with$ ssh odroid - Use the command
dfto see if the disk is mounted:odroid@server:~$ df -h /mnt/ethdisk Filesystem Size Used Avail Use% Mounted on /dev/nvme0n1p1 1.8T 77M 1.7T 1% /mnt/ethdisk
Install Tmux
Before we start running any long processes on the box, I recommend installing tmux:
$ sudo apt-get update
$ sudo apt-get upgrade
$ sudo apt-get install tmux
Start a new tmux session by running: tmux new -s install (this will create a session called “install” that can be run in the background. If you lose your connection to the box, just re-ssh in and run the command tmux attach -t install to re-open your session.
Now you are ready to set up your ethererum node
Setting up the Ethereum Node
Selecting the right Clients
Before Ethereum moved to Proof-of-stake, you only needed to set up one client to create an ethereum node. Since the merge you now need to run 2 clients:
- The Execution Client – Handles transactions, deployment and execution of smart contracts
- The Consensus Client – The Beacon Chain is the coordination mechanism of the new network, responsible for creating new blocks, making sure those new blocks are valid, and rewarding validators with ETH for keeping the network secure. Aka, it handles the proof of stake stuff
There are many different implementations of both clients (which helps to keep the network secure). The most popular implementation of the execution client is go-ethereum or geth. We will use this (If you are staking, you are actually incentivized to use the least popular). Now because we have a pretty small machine that we are running on, we really want to find the most efficient software. According to the Ethereum on Arm documentation:

Nimbus is the recommended consensus client for our setup. To summarize, we will be using:
- go-ethereum (geth) as our execution client
- Nimbus as our consensus client
Installing Geth on Ubuntu via PPAs (source)
- Install Apt Repository (source) by running:
$ sudo apt update $ sudo apt install software-properties-common - The following command enables the launchpad repository:
$ sudo add-apt-repository -y ppa:ethereum/ethereum -
Then, to install the stable version of go-ethereum:
$ sudo apt-get update
$ sudo apt-get install ethereum
Geth should now be installed.
- Create these directories:
This is where we will store the sqlite database of the execution node$ mkdir /mnt/ethdisk/geth $ mkdir /mnt/ethdisk/geth/data/ $ mkdir /mnt/ethdisk/geth/data/mainnet -
From here run the cmd:
$ geth --authrpc.addr localhost --authrpc.port 8551 --authrpc.vhosts localhost --authrpc.jwtsecret /tmp/jwtsecret --datadir /mnt/ethdisk/geth/data/mainnetGeth will start and begin looking for peers. Once it has found enough peers, you should get the message “Post-merge network, but no beacon client seen. Please launch one to follow the chain!”, this is good because we haven’t launched a consensus client yet. Type
ctrl-cto kill the session, we don’t need it running yet.
The geth node will not start syncing with the network until our consensus client is up and running. We will use the default mode which is sync mode. Read more about it here. We will run the execution and consensus clients in parallel in system d below.
Installing Nimbus (source)
-
Run these commands:
$ sudo apt-get install -y chrony $ sudo apt-get install build-essential git cmake -
Clone the nimbus-eth2 repository into your home directory
$ git clone https://github.com/status-im/nimbus-eth2 $ cd nimbus-eth2 - Run the beacon node build process
$ make -j4 nimbus_beacon_nodeNOTE: This will take a while to run. Time to get a cup of tea and a few jaffa cakes… If you are paranoid you can see the job working by running the
htopcommand, if you install it
$ sudo apt update $ sudo apt upgrade $ sudo apt install htop - Copy the build into
/usr/bin/:$ sudo cp /home/odroid/nimbus-eth2/build/nimbus_beacon_node /usr/bin

Section 5. Sync and Run the Beacon Node (in tmux)
There are test networks available that you can use before working with the actual Ethereum Blockchain, aka mainnet. Practicing with a test network is absolutely essential if you are staking. Since we are not, I will be writing instructions to connec to mainnet
Sync and run the Beacon Node
The quickest way to sync the beacon node is to use a trusted source. Syncing without a trusted source could take weeks to complete on this device. The nimbus guide recommends this approach. Here is a nice FAQ on checkpoint syncing provided by Prysm.
- Create these directories:
This is where we will store the sqlite database produced by the sync.$ mkdir /mnt/ethdisk/nimbus $ mkdir /mnt/ethdisk/nimbus/data/ $ mkdir /mnt/ethdisk/nimbus/data/shared_mainnet_0 - You need to select one of the trusted sources recommended from here. I’m going to use https://beaconstate.ethstaker.cc
- Run this command to build the db from the trusted source:
You should see the message: “Done, your beacon node is ready to serve you! Don’t forget to check that you’re on the canonical chain by comparing the checkpoint root with other online sources. See https://nimbus.guide/trusted-node-sync.html for more information”$ build/nimbus_beacon_node trustedNodeSync \ --network:mainnet \ --data-dir=/mnt/ethdisk/nimbus/data/shared_mainnet_0 \ --trusted-node-url=https://beaconstate.ethstaker.cc - Install curl:
$ sudo apt-get update $ sudo apt-get upgrade $ sudo apt-get install curl - Start the node by running
The initial “sync” should take a few minutes to run. Then the backfill process will start which should take several hours. You can close the terminal anytime. Just re-open thw window again by re-establishing your ssh connection and open the tmux window withcd ~/nimbus-eth2 ./run-mainnet-beacon-node.sh --data-dir=/mnt/ethdisk/nimbus/data/shared_mainnet_0/ --rest=Yes --rest-port=5052$ tmux attach -t nimbusNOTE: It is essential you include the
--data-dirflag else the node will try to sync from scratch and take a month to complete. - You should verify you synced the correct chain. Heres the docs. Run the command:
and compare with another source$ curl http://localhost:5052/eth/v1/beacon/blocks/head/root - Ultimately we want to run our node using
systemdso it runs in the background, produces logs and automatically restarts if there is a system reboot. For now we will persist our session using tmux until we are sure everything is working. I will cover systemd setup in a later section
When the sync is finished (or sooner) kill this process by hitting ctrl-c
You can see how much space the beacon node database is taking up on disk with the du command
$ \du -h /mnt/ethdisk/nimbus/data/shared_mainnet_0/db/
65G     /mnt/ethdisk/nimbus/data/shared_mainnet_0/db/
Section 6. Running geth and Nimbus in tmux
Kick off Geth again in a separate tmux window:
$ geth --authrpc.addr localhost --authrpc.port 8551 --authrpc.vhosts localhost --authrpc.jwtsecret /tmp/jwtsecret --datadir /mnt/ethdisk/geth/data/mainnet
Now kick off nimbus again, but include the following options so it can communitcate with geth
--el=http://127.0.0.1:8551 \
  --jwt-secret=/tmp/jwtsecret
Altogether:
cd ~/nimbus-eth2
./run-mainnet-beacon-node.sh --data-dir=/mnt/ethdisk/nimbus/data/shared_mainnet_0/ --el=http://127.0.0.1:8551 --jwt-secret=/tmp/jwtsecret
Both nodes should now be working and should recognize each other. Geth will now begin the Snap sync proces. You should see incremental messages informing you of the download progress

Both clients running together should look something like this:
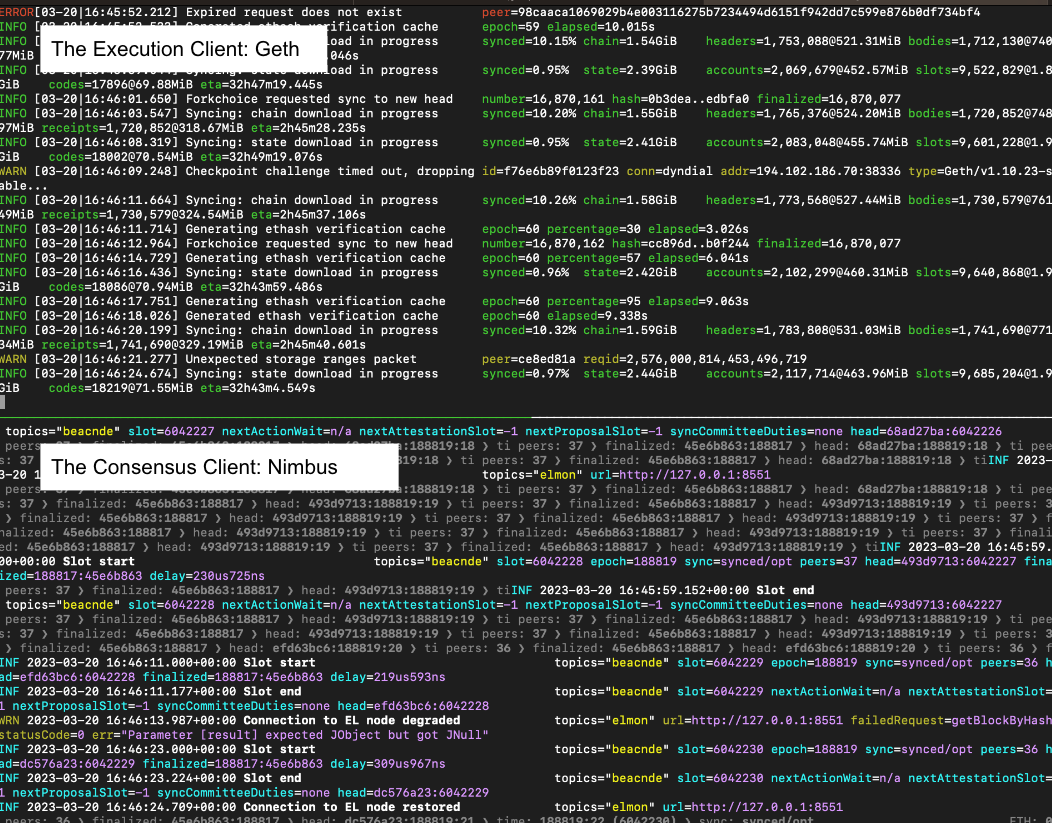
When the sync is finished kill both of these processes by hitting ctrl-c and we can go about setting this up for longevity using systemd.
Section 7. Long term running of your Eth Node with systemd
Set up a systemd service for your beacon node (Nimbus)
- Create the service file. systemd services are created by placing a service file in
/etc/systemd/system A good starting point is the example service file in the Nimbus repository. Lets download it and put it into the right directory using curl. First install curl if you havent already
$ sudo apt-get update
$ sudo apt-get upgrade
$ sudo apt-get install curl
- Run this command:
# Download example service file and save it to `/etc/systemd/system/nimbus_beacon_node.service`
curl -s https://raw.githubusercontent.com/status-im/nimbus-eth2/stable/scripts/package_src/nimbus_beacon_node/image/lib/systemd/system/nimbus_beacon_node.service | sudo tee /etc/systemd/system/nimbus_beacon_node.service > /dev/null
- Configure your service. Open the service file in vim:
$ sudo vim /etc/systemd/system/nimbus_beacon_node.service
- Most of the default options in this file work perfectly for our setup, to read more about them, see here. Also, I had to hardcode the parameters in the ExecStart command, I don’t know why it didnt pick them up from the file but it is working. Change the following parameters to match our setup:
# Where to store chain data
Environment=DATA_DIR_PREFIX=/mnt/ethdisk/nimbus/data/

User=odroid
Group=odroid
WorkingDirectory=/mnt/ethdisk/nimbus/data
...

ExecStart=/usr/bin/nimbus_beacon_node \
  --network=mainnet \
  --data-dir=/mnt/ethdisk/nimbus/data/shared_mainnet_0 \
  --tcp-port=9000 \
  --udp-port=9000 \
  --rest=Yes --rest-port=5052 \
  --metrics=Yes --metrics-port=8008 \
  --web3-url=http://127.0.0.1:8551 \
  --jwt-secret=/tmp/jwtsecret
- Notify systemd of the newly added service. Every time you add or update a service, the systemd daemon must be notified of the changes:
$ sudo systemctl daemon-reload
- Start the service (and start on boot)
$ sudo systemctl start nimbus_beacon_node
 $ sudo systemctl enable nimbus_beacon_node
- Check the status
$ sudo systemctl status nimbus_beacon_node.service
- Follow the logs:
$ sudo journalctl -f -u nimbus_beacon_node.service
Set up a systemd service for the Execution Node (Geth)
Set up a systemd service for your beacon node (Nimbus)
- Create the service file. systemd services are created by placing a service file in
/etc/systemd/systemA good starting point is the example service file in the Nimbus repository. Lets download it and put it into the right directory usingcurl. First installcurlif you havent already$ sudo apt-get update $ sudo apt-get upgrade $ sudo apt-get install curl - Run this command:
# Download example service file and save it to `/etc/systemd/system/nimbus_beacon_node.service` curl -s https://raw.githubusercontent.com/status-im/nimbus-eth2/stable/scripts/package_src/nimbus_beacon_node/image/lib/systemd/system/nimbus_beacon_node.service | sudo tee /etc/systemd/system/nimbus_beacon_node.service > /dev/null - Configure your service. Open the service file in vim:
$ sudo vim /etc/systemd/system/nimbus_beacon_node.service - Most of the default options in this file work perfectly for our setup, to read more about them, see here. Also, I had to hardcode the parameters in the ExecStart command, I don’t know why it didnt pick them up from the file but it is working. Change the following parameters to match our setup:
# Where to store chain data Environment=DATA_DIR_PREFIX=/mnt/ethdisk/nimbus/data/ User=odroid Group=odroid WorkingDirectory=/mnt/ethdisk/nimbus/data ... ExecStart=/usr/bin/nimbus_beacon_node \ --network=mainnet \ --data-dir=/mnt/ethdisk/nimbus/data/shared_mainnet_0 \ --tcp-port=9000 \ --udp-port=9000 \ --rest=Yes --rest-port=5052 \ --metrics=Yes --metrics-port=8008 \ --web3-url=http://127.0.0.1:8551 \ --jwt-secret=/tmp/jwtsecret - Notify systemd of the newly added service. Every time you add or update a service, the systemd daemon must be notified of the changes:
$ sudo systemctl daemon-reload - Start the service (and start on boot)
$ sudo systemctl start nimbus_beacon_node $ sudo systemctl enable nimbus_beacon_node - Check the status
$ sudo systemctl status nimbus_beacon_node.service - Follow the logs:
$ sudo journalctl -f -u nimbus_beacon_node.service
Set up a systemd service for the Execution Node (Geth)
Geth does not provide guidance or templates for running geth thru systemd so I’ve pieced this together myself. I did find the ethereum on arm project geth .service file
- Create the service file
/etc/systemd/system/geth_node.service - Copy the following into the file:
[Unit] Description=Ethereum go client After=syslog.target network.target [Service] User=odroid Group=odroid Environment=HOME=/home/odroid Type=simple ExeStart=/usr/bin/geth --cache 2048 --authrpc.addr localhost --authrpc.port 8551 --authrpc.vhosts localhost --authrpc.jwtsecret /tmp/jwtsecret --datadir /mnt/ethdisk/geth/data/mainnet KillMode=process KillSignal=SIGINT TimeoutStopSec=90 Restart=on-failure RestartSec=10s [Install] WantedBy=multi-user.target - Notify systemd of the newly added service. Every time you add or update a service, the systemd daemon must be notified of the changes:
$ sudo systemctl daemon-reload - Start the service (and start on boot)
$ sudo systemctl start geth_node $ sudo systemctl enable geth_node - Check the status
$ sudo systemctl status geth_node.service - Follow the logs:
$ sudo journalctl -f -u geth_node.service
Now, that should be it! You should now have a running etherum node contributing to the network! There are still some features missing. Aka monitoring your node. I believe Geth does have a nice web interface built in for monitoring that works straight out of the box if you are running on a machine that has a browser. I may do a follow up post soon on monitoring on Ubuntu server.
Also, at the time of writing I have both clients running successfully in systemctl, but the Geth node is still syncing. So I may have more to share once its finished!
Trying set up a node yourself? Feel free to reach out, I’d love to hear how you get on.
